
This chapter discusses some of the methods you can use with Ubuntu servers to make them more fault-tolerant, starting with some general fault tolerance principles, then covering ways to add fault tolerance to your storage and network with RAID and Ethernet bonding, respectively, and finally explaining how to set up a basic two-server cluster.
Hardware fails. Over the years I have had basically every major hardware component on a server fail, from CPUs to RAM to SCSI controllers and, of course, hard drives. In addition to hardware failure, system downtime is often the result of some other problem such as a bad configuration on a switch, a power outage, or even a sysadmin accidentally rebooting the wrong server. If you lose money whenever a service is down, you quickly come up with methods to keep that service up no matter what component fails.
In this chapter I will discuss some of the methods you can use with Ubuntu servers to make them more fault-tolerant. I will start with some general fault tolerance principles. Then I will talk about ways to add fault tolerance to your storage and network with RAID and Ethernet bonding, respectively. Of course, even with those procedures in place your server could crash or reboot, or you could lose a CPU, so finally I will talk about how to set up a basic two-server cluster.
Fault Tolerance Principles
- Build redundant systems.
- Favor hot-swappable components.
- Test your redundancy.
- Eliminate any single points of failure.
- Respond to failures quickly.
The basic idea behind fault tolerance is to set up your systems so that you can lose any one component without an outage. These days servers with redundant power supplies and redundant disks are common. There are even servers that have redundant BIOSs and remote management ports. The downside with redundancy is that it is often wasteful. For instance, with RAID you typically lose at least one disk’s worth of storage for redundancy. When compared to the cost of downtime, though, for most sysadmins it is worth the extra cost.
RAID is great because it protects you from losing data and your host going down because of a disk failure, but if you have to power down the host to replace the drive, you get little benefit. Where possible, favor components that are hot-swappable. These days servers are likely to offer at least hot-swappable drives and power supplies, and many have hot-swappable fans as well. In some higher-end blade servers you can even hot-swap integrated network and SAN switches and remote management cards.
As with backups, if you haven’t tested your fault tolerance, then you don’t have fault tolerance. If possible, before you deploy a new redundant system such as Ethernet bonding or server clustering, be sure to simulate failures and understand both how the system responds to a failure as well as how it responds once the fault has been repaired. Systems can behave very differently in both how they handle a fault and how they resume after the fault is repaired, all based on how you configure them. This testing phase is also a good time to test any monitoring you have put in place to detect these failures.
While having some redundancy is better than having none, try to go through the entire server stack and identify and eliminate any single points of failure. For instance, if you have set up redundant power sources for your data center and each server has a power supply hooked into one of the power sources, it is less useful if the servers are connected to one switch with a single power supply. For larger operations, even a data center itself is seen as a single point of failure, so in those cases servers are distributed across multiple data centers in entirely different geographical locations.
When a component fails, try to identify and repair the problem as soon as you can. In RAID, for instance, many sysadmins set up a disk as a hot spare so that the moment a disk fails, a replacement can take its place. Provided the hot spare syncs before another drive fails, the data will still be intact. While you can’t do this with every component, when you do have a fault, try to repair it before you lose the fail-over side as well.
RAID
The piece of server hardware most likely to fail is your hard drive, so if you want a fault-tolerant system, hard drive redundancy should be your first priority. This is generally accomplished using RAID. RAID stands for Redundant Array of Inexpensive Disks, although some people say it stands for Redundant Array of Independent Disks (those people must have priced out Fiber Channel drives).
RAID is generally referred to as either hardware or software RAID. With hardware RAID, your server has a component either built into the motherboard or available as an add-on card to which your hard drives connect. This hardware supports various RAID levels and typically has its own processor and memory to perform any calculations (such as parity calculations on RAID 5). The card then presents the storage as a single device (sometimes as a generic SCSI drive and other times as a different block device, depending on the vendor) that you can partition, format, and use. Any configuration, recovery, or monitoring typically requires special software on the host or work within the BIOS.
With software RAID, the operating system implements the RAID algorithms using the regular CPU with a driver or module. On Linux you can see both the original drives and partitions as well as a special device that represents the RAID storage. The advantage of Linux software RAID is that it doesn’t require any special vendor support under Linux, and it actually performs surprisingly well, is surprisingly stable, and is free. Also, unless you invest in high-end RAID cards, Linux software RAID provides more flexibility in how you can expand a RAID. For the rest of the chapter I will focus on Linux software RAID, and I will discuss how you can migrate a system from a single drive to RAID and from RAID 1 to RAID 5, as well as how to add a drive to a RAID 5 array.
RAID Levels
There are a number of different ways to implement RAID. Each has advantages and disadvantages, depending on what you want to accomplish. Next I will cover the Linux software RAID types you will most likely want to use.
RAID 0
You could consider RAID 0, also known as striping, to be a bit misleading. It is actually not a redundant array at all. With a RAID 0 array you need at least two disks. Each write to this array is striped across both disks so that in effect the two drives become one large disk. So if you have two 100Gb hard drives in a RAID 0 array, you will have 200Gb of storage. While RAID 0 offers great speed, the downside is that there is no redundancy. If you lose a drive in a RAID 0 array, all of your data is lost. For the examples in this chapter I will use RAID 1 and 5; I just mention RAID 0 to illustrate the difference in RAID levels.
RAID 1
RAID 1 is also known as mirroring. In a RAID 1 array every bit that is written to one disk is copied to the other. As with RAID 0, RAID 1 requires at least two drives; however, in this case a RAID 1 array is only as big as one of its drives. So if you had two 100Gb drives in a RAID 1 array, you would have 100Gb of storage. The upside is that you could lose one of the drives in the array and still have all of your data.
RAID 5
RAID 5 is also known as striping plus parity. A RAID 5 array requires at least three drives. Every time the array is written to, the data is split across the three drives. In addition to the data, parity information is split among the drives so that any drive in the array can fail and not only will the remaining drives have all of the data, once the failed drive is replaced, the other drives can rebuild it. In a RAID 5 array you basically lose one drive’s worth of storage, so in a RAID 5 array of three 100Gb disks you would have 200Gb of storage. A RAID 5 array of four 100Gb disks would have 300Gb of storage.
Configure RAID during Installation
You can set up a RAID array under Ubuntu either during the initial installation or afterward. The installer provides a nice graphical interface to create arrays that are ready to use after the install completes, so if you are installing a new machine, it makes sense to set up the RAID from the installer.
RAID configuration is done during the partitioning section of the install process. Once you see the main partition screen, select “Manual partitioning.” In my example I will set up RAID on a three-disk machine. I will have a three-partition RAID 1 array for /boot, a three-partition RAID 5 array for /, and a three-partition RAID 5 array for swap.
The first step is to partition each of the disks so they have a /boot, /, and swap partition. When you size the partitions, keep in mind that RAID 1 arrays are only as big as one of the partitions, whereas RAID 5 arrays are as big as all of the partitions combined, minus the size of one partition. While it’s not required that each partition be equal in size, the arrays will base everything on the smallest partition, so if you can make each partition in an array the same size, you will have an easier time.
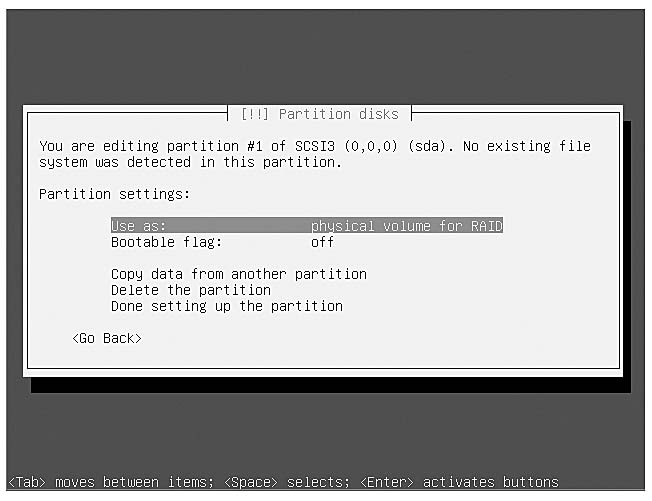
When you get to the partition settings for each new partition, the section where you can choose the file system and mount point, change the “Use as” option so that it says “physical volume for RAID,” as shown in Figure 10-1.
Figure 10-1 Partition settings for software RAID
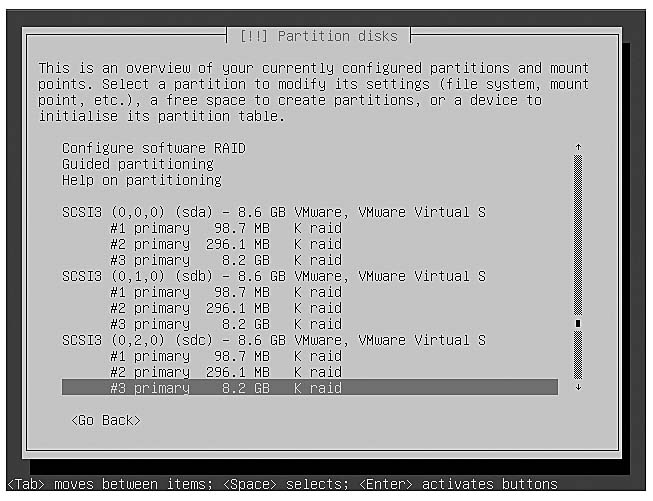
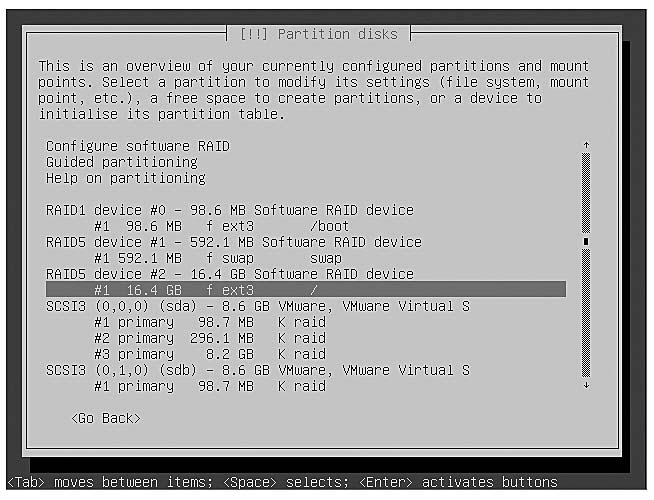
Once you are finished partitioning, you will have a number of partitions on each drive of type K raid, as shown in Figure 10-2. At the top of the screen you will see an option “Configure software RAID.” Select that option and at the next screen say Yes to write the changes to the partitioning tables of each of the disks, once you are sure each partition is the size you want.
Figure 10-2 RAID partitioning completed
The next step in the process is to create a multidisk (MD) device for each RAID array. In my case I want to create three MD devices, one for my RAID 1 /boot, one for my RAID 5 swap, and one for my RAID 5 /. For each of these MD devices, I select Create MD, then select the RAID level I want; then I choose the number of active and spare devices I want in the array. In my case I won’t have any spare devices, so I will set this option to three active devices for each array and zero spare devices. Finally, I will select which partitions to use in a particular MD device. If you created each partition in the same order on your drives, this will be simple since /dev/sda1, /dev/sdb1, and /dev/sdc1 (in my case) are all part of the same MD device. Repeat this process until you have created all of the MD devices and then select Finish.
When you are finished, the partition screen will display your RAID devices as in Figure 10-3. What you will notice is that each of your SCSI drives appears as before, but above them are the RAID devices. These devices will be numbered and will display their RAID level as well as the overall size of the RAID device.
Figure 10-3 Partition menu with RAID devices created
The next step is to tell the partitioner how to use each of these new RAID devices. Select the unlabeled partition on the line under each RAID device and hit Enter. From there you can configure the file system, mount point, and other options as if it were an ordinary partition. See Figure 10-4 for an example of how my final partition menu looked when I was done. Once you are finished, select “Finish partitioning” and write the changes to disk. The installation program will then continue the rest of the install process. Skip ahead to the Software RAID Management section to learn how to use the features of the mdadm package to manage your software RAID.
Figure 10-4 Completed RAID partitioning
Configure RAID after Installation
You may choose to add RAID storage to a server after the initial installation. Later in the chapter I will discuss how to migrate from a single disk to a RAID array and how to migrate from one RAID type to another, but for now I will assume you simply want to add a RAID array to an existing server. For this example I will assume I have added three new drives, /dev/sdb, /dev/sdc, and /dev/sdd, and I want to partition the drives and create a RAID 5 array across all three partitions that I will then mount at /mnt/storage.
Software RAID arrays are created and managed under Ubuntu with the mdadm tool. This tool might not be installed by default; if it isn’t, run sudo apt-get install mdadm to install the package. The next step is to partition each of these drives. In my case I will just create a single partition that spans the full drive. Use whichever partitioning tool you prefer (like fdisk or cfdisk) as though you were creating any other partition. The only difference here is to change the partition type from the default of 82 to fd. The fd partition type is set aside for Linux RAID autodetect. If a partition is set to that type, it tells Linux that it is part of a software RAID array.
Once your partitions are set up, you can use mdadm on the command line to create the MD device. In the case of a RAID 1 array you would type
$ sudo mdadm --create /dev/md0 --level=1 –raid-devices=2  /dev/sdb1
    /dev/sdc1
mdadm: array /dev/md0 started.
Most of the arguments here are pretty self-explanatory. The --create option tells mdadm that I want to create a new MD device at /dev/md0. If I already had a RAID array at /dev/md0, I would just pick the next number, such as /dev/md1. The --level option sets which RAID level to use for this array, --raid-devices sets the number of active devices, and finally you specify each partition you want to use for the array.
In my case I want to set up a RAID 5 array across /dev/sdb1, /dev/sdc1, and /dev/sdd1, so I would type
$ sudo mdadm --create /dev/md0 --level=5 --raid-devices=3 /dev/sdb1
    /dev/sdc1 /dev/sdd1
mdadm: array /dev/md0 started.
Once I have created the array, I can check out its current health in the /proc/mdstat file:
$ cat /proc/mdstat
Personalities : [raid6] [raid5] [raid4]
md0 : active raid5 sdd1[2] sdc1[1] sdb1[0]
     16771584 blocks level 5, 64k chunk, algorithm 2 [3/3] [UUU]

unused devices:
Now I can treat /dev/md0 like any other partition and format it with a file system of my choice and then mount it:
$ sudo mkfs -t ext3 /dev/md0
$ sudo mkdir /mnt/storage
$ sudo mount /dev/md0 /mnt/storage
Now this array is up and functioning; however, it is not yet set up to automatically start and mount at boot time. If you don’t set this up, you will have to run an mdadm command to assemble the array along with a mount command each time the system boots. To start the array at boot time, you need to configure /etc/mdadm/mdadm.conf with details about your array. Now you could certainly do this by hand, but mdadm provides a simpler way. The mdadm --detail --scan command will output an mdadm.conf-compatible string for each of your arrays, so all you have to do is redirect that output to the /etc/mdadm/mdadm.conf file:
$ sudo sh -c 'mdadm --detail --scan >> /etc/mdadm/mdadm.conf'
Now edit your /etc/fstab and add an entry for /dev/md0 as though it were any other mount point. In my case I would add
/dev/md0 /mnt/storage ext3 defaults 0 0
Alternatively, I could specify the UUID for this device in fstab as with the rest of the partitions. To figure that out I would type
$ sudo vol_id /dev/md0 | grep UUID=
ID_FS_UUID=99e190a7-dfe7-48ee-bf56-f426ef5343af
Once /etc/mdadm/mdadm.conf and /etc/fstab are set up, I can reboot and then check /proc/mdstat to make sure the array comes up and then confirm it is mounted.
Software RAID Management
The bulk of the management of your software RAID arrays is done in two places: /proc/mdstat and mdadm. The /proc/mdstat file will provide you with the current status of all of your running RAID arrays, including progress bars should any of them rebuild a disk. A standard /proc/mdstat file for a single RAID array might look like the following:
$ cat /proc/mdstat
Personalities : [raid6] [raid5] [raid4]
md0 : active raid5 sdd1[2] sdc1[1] sdb1[0]
     16771584 blocks level 5, 64k chunk, algorithm 2 [3/3] [UUU]

unused devices:
In the output you can see which array is active (md0), what RAID level it uses (raid5), and which partitions it is using (sdd1, sdc1, and sdb1). In the final line you can see that the RAID is healthy in that it has three out of three disks all active ([3/3] [UUU]). That section will change if any disks become faulty, as we will see below.
While you can get status from /proc/mdstat, the bulk of the actual RAID management will be done with mdadm. For instance, this tool can report basic and more complete information about an array with the --query and --detail arguments respectively:
$ sudo mdadm --query /dev/md0
/dev/md0: 15.99GiB raid5 3 devices, 0 spares. Use mdadm --detail
  for more detail.
$ sudo mdadm --detail /dev/md0
/dev/md0:
	        Version : 	00.90.03
	  Creation Time : 	Wed Feb 11 21:31:16 2009
	     Raid Level : 	raid5
	     Array Size : 	16771584 (15.99 GiB 17.17 GB)
	  Used Dev Size : 	8385792 (8.00 GiB 8.59 GB)
	   Raid Devices : 	3
	  Total Devices :	3
	Preferred Minor :	0
	    Persistence :	Superblock is persistent

	    Update Time : 	Wed Feb 11 22:11:49 2009
	          State : 	clean
	 Active Devices : 	3
	Working Devices : 	3
	 Failed Devices : 	0
	  Spare Devices : 	0

	         Layout : 	left-symmetric
	     Chunk Size : 	64K

	           UUID : 	37090db5:5fafad78:e368bf24:bd0fce41 (local to
			     		host ubuntu)
	         Events : 	0.4

               Number    Major   Minor   RaidDevice State
                0   8      17       0    active sync   /dev/sdb1
                1   8      33       1    active sync   /dev/sdc1
                2   8      49       2    active sync   /dev/sdd1
Replace a Failed Disk
While all of the information from mdadm can be useful, you will find you mostly use mdadm when a drive fails. When a drive fails, the mdadm daemon that runs on the system will automatically send an e-mail to the root user on the host. To change this, edit /etc/mdadm/ mdadm.conf and locate the MAILADDR option in the file. After you save your changes, run sudo /etc/init.d/mdadm reload to load the new options. Apart from the e-mail you can also see that a drive has failed from /proc/mdstat:
$ cat /proc/mdstat
Personalities : [linear] [multipath] [raid0] [raid1] [raid6]
  [raid5] [raid4] [raid10]
md0 : active raid5 sdb1[0] sdd1[3](F) sdc1[1]
     16771584 blocks level 5, 64k chunk, algorithm 2 [3/2] [UU_]

unused devices:
Here you can see that sdd1 is marked with an (F) stating it has failed, and on the third line of output the array shows two out of three disks ([3/2] [UU_]). The next step is to remove the disk from /dev/md0 so that I can swap it out with a new drive. To do this I run mdadm with the --remove option:
$ sudo mdadm /dev/md0 --remove /dev/sdd1
The drive must be set as a failed drive for you to remove it, so if for some reason mdadm hasn’t picked up the drive as faulty but you want to swap it out, you might need to set it as faulty before you remove it:
$ sudo mdadm /dev/md0 --fail /dev/sdd1
The mdadm command supports chaining commands, so you could fail and remove a drive in the same line:
$ sudo mdadm /dev/md0 --fail /dev/sdd1 --remove /dev/sdd1
Once you remove a drive from an array, it will be missing from /proc/mdstat:
$ cat /prod/mdstat
Personalities : [linear] [multipath] [raid0] [raid1] [raid6]    [raid5] [raid4] [raid10]
md0 : active raid5 sdb1[0] sdc1[1]
     16771584 blocks level 5, 64k chunk, algorithm 2 [3/2] [UU_]

unused devices:
Now you can swap out the drive with a fresh one and partition it. Be sure that when you replace drives you create new partitions to be equal or greater in size than the rest of the partitions in the RAID array. Once the new partition is ready, use the --add command to add it to the array:
$ sudo mdadm /dev/md0 --add /dev/sdd1
Now mdadm will start the process of resyncing data. This can take some time, depending on the speed and size of your disks. You can monitor the progress from /proc/mdstat:
$ cat /proc/mdstat

Personalities : [linear] [multipath] [raid0] [raid1] [raid6]
    [raid5] [raid4] [raid10]
md0 : active raid5 sdd1[3] sdb1[0] sdc1[1]
     16771584 blocks level 5, 64k chunk, algorithm 2 [3/2] [UU_]
     [>....................]  recovery =  2.0% (170112/8385792)
	        finish=1.6min speed=85056K/sec

unused devices:
Beyond this basic RAID management there are a number of different tweaks and customizations you can make to RAID arrays, particularly when you create them. For a full list of options and settings check out the mdadm manual (man mdadm).
Migrate Non-RAID to Software RAID
If you didn’t build your system with RAID in mind, you might find yourself in a situation where you want to move a single-disk system to software RAID. I’ve even had situations where I had a RAID 1 array that I wanted to move to a RAID 5 to increase its storage. In this section I will discuss how to perform both of these migrations, along with how to add a disk to a RAID 5 array.
In this example I will assume that I already have an installed system on /dev/sda. This is a basic Ubuntu install with a root partition at /dev/sda1 and a swap partition on /dev/sda5. I have added a second disk to the system at /dev/sdb1, and I’d like to make a RAID 1 array for both the root partition and the swap partition. Before I perform any additional steps, I want to make sure that the mdadm package is installed on my server, so I run
$ sudo apt-get install mdadm
Because I need to be able to copy all of the files from the old system to the new RAID array, I can’t perform all of these steps from the running system. Instead, I need some sort of live CD or rescue disc so that no partitions are being written to. The Ubuntu Server install CD works OK for this; just boot from it and select the “Rescue a broken system” option. After you answer the basic keyboard and layout questions, you will get to a recovery menu with a few different recovery options. Here choose “Execute a shell in the installer environment.”
Once you are in the installer environment, the first step is to use fdisk to partition /dev/sdb and at least create a /dev/sdb1 partition that is the same size as or larger than /dev/sda1. It’s easier if the drives are the same size, because you can just re-create the partitions that are on /dev/sda, including the swap partition. As you create the partitions, remember to set their partition type to fd.
Once the partitions are created, you are ready to create the arrays. Since we are currently using /dev/sda1 and /dev/sda5 on the system, we will create the arrays in degraded mode, format them, copy all of the data to the new RAID arrays, boot off of the arrays in degraded mode, then finally hot-add the original partitions. This way we will always have a safe copy of our data at every step. A degraded array is made much like a regular array, only in place of the missing drive you use the word missing:
# mdadm --create /dev/md0 --level=1 --raid-devices=2 /dev/sdb1 missing
mdadm: array /dev/md0 started
# mdadm --create /dev/md1 --level=1 --raid-devices=2 /dev/sdb5 missing
mdadm: array /dev/md1 started
Now I will format /dev/md0 with an ext3 file system and /dev/md1 with a swap file system:
# mkfs.ext3 /dev/md0
# mkswap /dev/md1
Now you can create a temporary mount point for /dev/md0 and migrate all of the files from the root partition to this new partition. The Ubuntu recovery mode by default will mount the root partition under /target, but if you use another rescue disc, or if you need to mount and migrate multiple partitions to multiple arrays, you will have to mount those individually.
Unfortunately the Ubuntu Server recovery mode doesn’t include the tools that I prefer to copy files to a new system, tools like cpio or rsync, and even the version of find is not full-featured, so instead I will use the find and cpio commands from my server’s root partition:
# mkdir /mnt/temp
# mount /dev/md0 /mnt/temp
# cd /target
# ./usr/bin/find . -xdev -print0 | ./bin/cpio -pa0V /mnt/temp
Of course, if you mounted your root partition (or the partition you wanted to migrate) somewhere other than /target, then cd to that directory instead. This command might take some time to run since it has to copy all of the files from the system.
Now that the system has been migrated to /dev/md0, you need to set up the array to automatically load at boot time. First we add the arrays we configured to /etc/mdadm/mdadm.conf inside where /dev/md0 is mounted. Then update its initramfs so it creates these devices at boot:
# mdadm --detail --scan >> /mnt/temp/etc/mdadm/mdadm.conf
# chroot /mnt/temp update-initramfs -u 2.6.24-23-server
update-initramfs: Generating /boot/initrd.img-2.5.24-23-server
Be sure to change the update-initramfs argument to point to your initrd file (check /mnt/temp/boot/ for the initramfs files from which you can choose).
Next I need to edit the /etc/fstab file on the RAID array so that it points to the RAID arrays instead of the partitions on /dev/sda. Since we have a limited set of tools on the rescue disc, this means using the nano text editor. First edit /mnt/temp/etc/fstab, comment out the current entry for /, and add a similar line that points to /dev/md0. Then do the same for the swap file line. You can add either the actual device name or the UUID for these devices here.
Now you are ready to reboot into the new system. Type exit in the shell you are in and then select the “Reboot the system” option. When the system reboots and you see GRUB initially load, hit the Esc key to stop GRUB from booting so you can edit the boot options. Once you can see the list of boot choices, make sure the first option, which should be your main kernel, is highlighted and then hit E to edit it. The first highlighted line will say root (hd0,0), or if not it will point to your old root device, so hit E to change it to point to the new device. In my case I change it to root (hd1,0). Then highlight the second line that lists the commands to pass to the kernel at boot and backspace over the root=UUID= section, including the full UUID, and in its place put root=/dev/md0. In my case the final GRUB options read
root (hd1,0)
kernel /boot/vmlinuz-2.6.24-23-server root=/dev/md0 ro quiet splash
initrd /boot/initrd.img-2.6.24-23-server
quiet
Once you are finished changing these options, hit the B key to boot into the system on the RAID array. If you set the boot arguments and the /etc/fstab correctly, when you boot and type df, you should see your root device is /dev/md0 (or what you assigned your RAID array):
$ df
Filesystem     1K-blocks       Used Available Use% Mounted on
/dev/md0         8231864     634492   7182500   9% /
. . .
When you check /proc/mdstat, you will see your active arrays running on a single disk:
$ cat /proc/mdstat
Personalities : [linear] [multipath] [raid0] [raid1] [raid6]    [raid5] [raid4] [raid10]
md1 : active raid1 sdb5[0]
      88256 blocks [2/1] [U_]

md0 : active raid1 sdb1[0]
      8297472 blocks [2/1] [U_]

unused devices:
Now you are ready to add the original partitions to each array:
$ sudo mdadm /dev/md0 --add /dev/sda1
$ sudo mdadm /dev/md1 --add /dev/sda5
$ cat /proc/mdstat
Personalities : [linear] [multipath] [raid0] [raid1] [raid6]    [raid5] [raid4] [raid10]
md1 : active raid1 sda5[2] sdb5[0]
      88256 blocks [2/1] [U_]
      	resync=DELAYED

md0 : active raid1 sda1[2] sdb1[0]
      8297472 blocks [2/1] [U_]
      [=>...................]  recovery =  5.6% (471936/8297472)
	    finish=12.3min speed=10550K/sec

unused devices:
The arrays will sync up in the background, but you can use your system in the meantime. Now you will want to edit your /boot/grub/menu.lst; locate the line that starts with # kopt, and change the UUID to match the UUID of your root RAID array device (in my case /dev/md0). Remember that you can get the UUID when you run either ls -l /dev/disk/by-uuid/ or sudo vol_id /dev/md0 | grep UUID=. Once you edit the file, run sudo update-grub to rebuild the array.
Now the problem you will find when you run a software RAID array is that GRUB will install only on the first disk. If you lose the first disk, the second disk won’t automatically be able to boot the system. To fix this you will have to manually install GRUB to the second disk. You can do this on the command line, or you can create a quick script called /usr/local/sbin/ grubraid that contains the following data:
#!/bin/sh

grub --no-curses << "EOG"
root (hd0,0)
setup (hd0)
device (hd0) /dev/sdb
root (hd0,0)
setup (hd0)
quit
EOG
Change the device line from /dev/sdb to your second RAID device. Also, I’m assuming that the root device is the first partition on the drive (hd0,0), so you might need to change that if your root partition is the second or third partition on the drive. If you have a third RAID device, the script would look like this:
#!/bin/sh

grub --no-curses << "EOG"
root (hd0,0)
setup (hd0)
device (hd0) /dev/sdb
root (hd0,0)
setup (hd0)
device (hd0) /dev/sdc
root (hd0,0)
setup (hd0)
quit
EOG
Now give the script execute permissions and run it as root:
$ sudo chmod +x /usr/local/sbin/grubraid
$ sudo /usr/local/sbin/grubraid
Probing devices to guess BIOS drives. This may take a long time.

       [ Minimal BASH-like line editing is supported.   For
         the   first   word,  TAB  lists  possible  command
         completions.  Anywhere else TAB lists the possible
         completions of a device/filename. ]
grub> root (hd0,0)
grub> setup (hd0)
  Checking if "/boot/grub/stage1" exists... yes
  Checking if "/boot/grub/stage2" exists... yes
  Checking if "/boot/grub/e2fs_stage1_5" exists... yes
  Running "embed /boot/grub/e2fs_stage1_5 (hd0)"...  16 sectors are
        embedded.
succeeded
  Running "install /boot/grub/stage1 (hd0) (hd0)1+16 p
        (hd0,0)/boot/grub/stage2 /boot/grub/menu.lst"... succeeded
Done.
grub> device (hd0) /dev/sdb
grub> root (hd0,0)
grub> setup (hd0)
  Checking if "/boot/grub/stage1" exists... yes
  Checking if "/boot/grub/stage2" exists... yes
  Checking if "/boot/grub/e2fs_stage1_5" exists... yes
  Running "embed /boot/grub/e2fs_stage1_5 (hd0)"...  16 sectors are
        embedded.
succeeded
  Running "install /boot/grub/stage1 (hd0) (hd0)1+16 p
        (hd0,0)/boot/grub/stage2 /boot/grub/menu.lst"... succeeded
Done.
grub> quit
The final step is to use a partitioning tool on /dev/sda and set both partitions to partition type fd so that they will automatically be detected as RAID devices. Reboot your system one final time to ensure it will boot to your RAID array. Now your system is fault-tolerant and ready to use.
Migrate from RAID 1 to RAID 5
At some point you might decide that a particular system needs to expand from RAID 1 to RAID 5. In most cases this is because your RAID array needs more storage. If you add an extra drive and migrate to RAID 5, you can double your available storage while keeping redundancy.
In this example I will migrate the RAID 1 system I mentioned above into a RAID 5 system. Currently it has two RAID 1 arrays, /dev/md0 composed of /dev/sda1 and /dev/sdb1 for my / partition, and /dev/md1 composed of /dev/sda5 and /dev/sdb5 which I use for swap space. I will add a third drive, /dev/sdc, and migrate the system to a RAID 5 array.
There are some special considerations when your root partition is on RAID 5 since GRUB can’t directly boot from it. You will need to set up a small /boot partition that is not RAID 5 for GRUB to boot from. You can still have fault tolerance here; you will just have to make your /boot partition RAID 1.
Just as when I migrated from a single drive to a RAID 1 array, to migrate to a RAID 5 array I will need to use a rescue disc. I will use the Ubuntu Server rescue mode in this case, so boot from your Ubuntu Server install CD and select “Rescue a broken system” at the boot menu. When you get to the section that lets you select your root file system, be sure to choose the correct MD device (in my case /dev/md0). At the main rescue operations menu choose “Execute a shell in the installer environment.”
The general procedure for this migration is much like migrating from a single disk to RAID 1. We will partition /dev/sdc the way we want the new array to look, remove /dev/sdb from both RAID 1 arrays, repartition it, then create our new degraded RAID arrays and set them up so the system can boot from them. Once we successfully boot from the new arrays, we will destroy the old arrays, repartition the final drive, and hot-add it.
So first I will partition /dev/sdc. I will create a 100Mb /boot partition at /dev/sdc1, then create my root and swap partitions with the remaining space. Since the RAID 5 arrays will be larger anyway, I don’t have to worry that I’m robbing 100Mb from the root partition. Remember to create each of the partitions as type fd. My final disk looks like this:
 Device  Boot Start  End  Blocks   Id  System
/dev/sdc1                   1     13  104391   fd  	Linux raid autodetect
/dev/sdc2      14   1033 8193150   fd  Linux raid autodetect
/dev/sdc3     1034   1044   88357+   5  Extended
/dev/sdc5     1034   1044   88326   fd  Linux raid autodetect
Now I use mdadm to remove /dev/sdb partitions from both RAID arrays:
# mdadm /dev/md0 --fail /dev/sdb1
mdadm: set /dev/sdb1 faulty in /dev/md0
# mdadm /dev/md0 --remove /dev/sdb1
mdadm: hot removed /dev/sdb1
# mdadm /dev/md1 --fail /dev/sdb5
mdadm: set /dev/sdb5 faulty in /dev/md1
# mdadm /dev/md1 --remove /dev/sdb5
mdadm: hot removed /dev/sdb5
Now use fdisk to change the partition table of /dev/sdb to match /dev/sdc. Once you change the partition table of /dev/sdb and write the changes, you might get an error that the kernel will use the old partition table until the system reboots. If that happens, you will have to reboot back into the rescue disk before you can continue. If you don’t get that error, proceed to the next step.
At this point I’m ready to create my three new RAID arrays. My /boot partition will be a RAID 1 /dev/md2, my root partition a RAID 5 /dev/md3, and my new swap drives will be a RAID 5 /dev/md4. Use mdadm to create all of these in failed mode:
# mdadm --create /dev/md2 --level=1 --raid-devices=3 /dev/sdb1
    /dev/sdc1 missing
# mdadm --create /dev/md3 --level=5 --raid-devices=3 /dev/sdb2
    /dev/sdc2 missing
# mdadm --create /dev/md4 --level=5 --raid-devices=3 /dev/sdb5
    /dev/sdc5 missing
When you create these arrays, you will probably get a warning about the /dev/sdb partitions containing a file system, but that’s expected so type Y so it continues. Once I’m done, if I check /proc/mdstat I will see all five of my RAID arrays in degraded mode:
# cat /proc/mdstat
Personalities : [linear] [multipath] [raid0] [raid1] [raid6]    [raid5] [raid4] [raid10]
md4 : active raid5 sdc5[1] sdb5[0]
      176512 blocks level 5, 64k chunk, algorithm 2 [3/2] [UU_]

md3 : active raid5 sdc2[1] sdb1[0]
    16386048 blocks level 5, 64k chunk, algorithm 2 [3/2] [UU_]

md2 : active raid1 sdc1[1] sdb1[0]
      104320 blocks [3/2] [UU_]

md1 : active raid1 sda5[0]
      88256 blocks [2/1] [U_]

md0 : active raid1 sda1[0]
      8297472 blocks [2/1] [U_]

unused devices:
Now you can format the new RAID arrays and create mount points for the new /boot and / partitions so you can transfer files to them:
# mkfs.ext3 /dev/md2
# mkfs.ext3 /dev/md3
# mkswap /dev/md4
# mkdir /mnt/boot
# mkdir /mnt/root
# mount /dev/md2 /mnt/boot
# mount /dev/md3 /mnt/root
Unfortunately, the Ubuntu Server recovery mode doesn’t include the tools that I prefer to copy files to a new system, tools like cpio or rsync, and even the version of find is not full-featured, so instead I will use the versions from my server. Finally I will copy over the /boot directory to my new /boot RAID array and remount the drive under /mnt/root:
# cd /target
# ./usr/bin/find . -xdev -print0 | ./bin/cpio -pa0V /mnt/root
# mv /mnt/root/boot/* /mnt/boot/
# umount /mnt/boot
# mount /dev/md2 /mnt/root/boot
Now that the system has been migrated to /dev/md3 and /dev/md2, you need to set up the array to automatically load at boot time. First we add the arrays we configured to the /etc/mdadm/mdadm.conf file where we mounted /dev/md3 and update its initramfs so it creates these devices at boot:
# mdadm --detail --scan >> /mnt/root/etc/mdadm/mdadm.conf
# chroot /mnt/root update-initramfs -u 2.6.24-23-server
update-initramfs: Generating /boot/initrd.img-2.6.24-23-server
Be sure to change the update-initramfs argument to point to your initrd file (check /mnt/root/boot/ for the initramfs files from which you can choose).
Next I need to edit the /etc/fstab file on the RAID 5 array so that it points to the RAID 5 arrays instead of the /dev/md0. I also need to add a reference to my new /boot partition. First edit /mnt/root/etc/fstab, comment out the current entry for /, and add a similar line that points to /dev/md2. Then add a new line for /boot. Finally, do the same for the swap file line. You can add either the actual device name or the UUID for these devices here. Here’s an example fstab file using the device names:
# /etc/fstab: static file system information. # #proc /proc proc defaults 0 0 #/dev/md0 / ext3 errors=remount-ro 0 1 /dev/md3 / ext3 errors=remount-ro 0 1 /dev/md2 /boot ext3 defaults 0 0 #/dev/md1 none swap sw 0 0 /dev/md4 none swap sw 0 0 /dev/scd0 /media/cdrom0 udf,iso9660 user,noauto,exec,utf8 0 0 /dev/fd0 /media/floppy0 auto rw,user,noauto,exec,utf8 0 0
Now you are ready to reboot into the new system. Type exit in the shell you are in and then select the “Reboot the system” option. When the system reboots and you see GRUB initially load, hit the Esc key to stop GRUB from booting so you can edit the boot options. Once you can see the list of boot choices, make sure the first option, which should be your main kernel, is highlighted and then hit E to edit it. The first highlighted line will say root (hd0,0) or point to your old root device, so change it to point to the new device. In my case I change it to root (hd1,0) since that’s where the new /boot partition is. Then highlight the second line that lists the commands to pass to the kernel at boot and backspace over the root=UUID= section, including the full UUID, and in its place put root=/dev/md3. Since hd1,0 is a partition that mounts at /boot, remove the references to /boot in the second and third lines. In my case the final GRUB options read
root (hd1,0)
kernel /vmlinuz-2.6.24-23-server root=/dev/md3 ro quiet splash
initrd /initrd.img-2.6.24-23-server
quiet
Once you are finished changing these options, hit the B key to boot into the system on the RAID array. If you set the boot arguments and the /etc/fstab correctly, when you boot and type df you should see that your root partition is /dev/md3 (or what you assigned your RAID array) along with your /boot partition:
$ df
Filesystem    1K-blocks     Used Available Use% Mounted on
/dev/md3        16254420     638276  14796844   5% /
. . .
/dev/md2          101018    23974     71828  26% /boot
When you check /proc/mdstat, you will see your active arrays running on a single disk:
$ cat /proc/mdstat
Personalities : [linear] [multipath] [raid0] [raid1] [raid6]    [raid5] [raid4] [raid10]
md4 : active raid5 sdc5[1] sdb5[0]
      176512 blocks level 5, 64k chunk, algorithm 2 [3/2] [UU_]

md3 : active raid5 sdc2[1] sdb1[0]
    16386048 blocks level 5, 64k chunk, algorithm 2 [3/2] [UU_]

md2 : active raid1 sdc1[1] sdb1[0]
      104320 blocks [3/2] [UU_]

md1 : active raid1 sda5[0]
      88256 blocks [2/1] [U_]

md0 : active raid1 sda1[0]
      8297472 blocks [2/1] [U_]

unused devices:
Next we need to destroy the original RAID arrays /dev/md0 and /dev/md1 so we can repartition the drive and assign those new partitions the new arrays:
$ sudo mdadm --stop /dev/md0
mdadm: stopped /dev/md0
$ sudo mdadm --stop /dev/md1
mdadm: stopped /dev/md1
When you check /proc/mdstat, you will see that those arrays are no longer available:
$ cat /proc/mdstat
Personalities : [linear] [multipath] [raid0] [raid1] [raid6]
    [raid5] [raid4] [raid10]
md4 : active raid5 sdc5[1] sdb5[0]
      176512 blocks level 5, 64k chunk, algorithm 2 [3/2] [UU_]

md3 : active raid5 sdc2[1] sdb1[0]
    16386048 blocks level 5, 64k chunk, algorithm 2 [3/2] [UU_]

md2 : active raid1 sdc1[1] sdb1[0]
      104320 blocks [3/2] [UU_]

unused devices:
Now repartition /dev/sda as you did /dev/sdb so its partitions match the other two drives. Remember to set the partition types to fd. Once you save your changes, if fdisk complains that the kernel is going to use the old partition table, you have a small problem. You won’t be able to safely add the new /dev/sda partitions to your RAID at this point. Instead, boot back into the rescue disc, select your RAID 5 root file system, then choose “Execute a shell in /dev/md3” (or the name of your root file system). Once you are at a prompt, type mount /boot so that the /boot partition is available. Otherwise, if fdisk doesn’t give that complaint, proceed with the next steps.
Finally, you are ready to add the original partitions to each array:
$ sudo mdadm /dev/md2 --add /dev/sda1
$ sudo mdadm /dev/md3 --add /dev/sda2
$ sudo mdadm /dev/md4 --add /dev/sda5
$ cat /proc/mdstat
Personalities : [linear] [multipath] [raid0] [raid1] [raid6]
    [raid5] [raid4] [raid10]
md4 : active raid5 sda5[3] sdc5[1] sdb5[0]
      176512 blocks level 5, 64k chunk, algorithm 2 [3/2] [UU_]
        resync=DELAYED

md3 : active raid5 sda5[3] sdc2[1] sdb1[0]
    16386048 blocks level 5, 64k chunk, algorithm 2 [3/2] [UU_]
      [=>...................]  recovery =  5.6% (471936/8297472) finish=12.3min
	   speed=10550K/sec

md2 : active raid1 sda1[2] sdc1[1] sdb1[0]
      104320 blocks [3/3] [UUU]

unused devices:
The arrays will sync up in the background, but you can use your system in the meantime. Now you will want to edit your /boot/grub/menu.lst; locate the line that starts with # kopt, and change the UUID to match the UUID of your root RAID array device (in my case /dev/md3). Remember that you can get the UUID when you run either ls -l /dev/disk/by-uuid/ or sudo vol_id /dev/md3 | grep UUID=. Once you edit the file, run sudo update-grub to rebuild the array.
Now the problem you will find when you run a software RAID array is that GRUB will install only on the first disk. If you lose the first disk, the second disk won’t automatically be able to boot the system. To fix this you will have to manually install GRUB to the second and third disks. You can do this on the command line, or you can create a quick script called /usr/local/sbin/grubraid that contains the following data:
#!/bin/sh

grub --no-curses << "EOG"
root (hd0,0)
setup (hd0)
device (hd0) /dev/sdb
root (hd0,0)
setup (hd0)
device (hd0) /dev/sdc
root (hd0,0)
setup (hd0)
quit
EOG
Change the devices listed in the device lines from /dev/sdb and /dev/sdc to your second and third RAID devices. Also, the word root here is a bit of a misnomer. I need to make sure that the root lines point to my /boot partition, not the / partition. In this case root refers to where GRUB looks for its configuration files. Now give the script execute permissions and run it as root:
$ sudo chmod +x /usr/local/sbin/grubraid
$ sudo /usr/local/sbin/grubraid
If you want you can edit /etc/mdadm/mdadm.conf and clean up any references to md0 and md1 since they no longer exist. If you do change this file, be sure to update your initramfs with
$ sudo update-initramfs -u 2.6.24-23-server
The final step is to use a partitioning tool on /dev/sda and set both partitions to partition type fd so that they will automatically be detected as RAID devices. Reboot your system to ensure it will boot to your RAID array. Now your system should be completely on RAID 5 and ready to use.
Add a Drive to a RAID 5 Array
It can be difficult to plan storage for a system. Even with the best plans in place, sometimes a machine’s purpose changes. In any case, when you need more storage on a RAID 5 array, you have a few options. You could potentially back up all of the data, create a brand-new RAID 5 array with an extra drive, and then restore, or you could attempt to grow the RAID 5 array hot. Now growing a RAID 5 array hot isn’t for the faint at heart. I would recommend you make a backup of your data if possible, just in case.
All warnings aside, let’s assume I have a standard three-disk system using RAID 5 as in my previous RAID 1 to RAID 5 migration example. I have added a fourth disk, /dev/sdd, to the server, and I want to extend my RAID arrays across it. Since we want to grow the file system of our root partition, we will need to do all of these steps from a rescue disc, so boot your Ubuntu Server install CD into recovery mode. When you are prompted to select a root file system, hit Alt-F2 to switch to a different console. We don’t want to mount any file systems since we plan to grow them.
Once you are in the rescue mode shell, use fdisk to partition the new drive so that it matches the other drives. Once that has completed, use mdadm to add the new partitions to each of the RAID arrays:
# mdadm /dev/md2 --add /dev/sdd1
mdadm: added /dev/sdd1
# mdadm /dev/md3 --add /dev/sdd2
mdadm: added /dev/sdd2
# mdadm /dev/md4 --add /dev/sdd5
mdadm: added /dev/sdd5
# cat /proc/mdstat
Personalities : [linear] [multipath] [raid0] [raid1] [raid6]
    [raid5] [raid4] [raid10]
md4 : active raid5 sdd5[3](S) sda5[2] sdc5[1] sdb5[0]
      176512 blocks level 5, 64k chunk, algorithm 2 [3/3] [UUU]

md3 : active raid5 sdd2[3](S) sda2[2] sdc2[1] sdb1[0]
    16386048 blocks level 5, 64k chunk, algorithm 2 [3/3] [UUU]

md2 : active raid1 sdd1[3](S) sda1[2] sdc1[1] sdb1[0]
      104320 blocks [3/3] [UUU]

unused devices:
Notice that the new partitions have been added to each array but they have an (S) after them to denote that they are currently hot spares. To extend the arrays to incorporate those drives as well, we need an additional mdadm command:
# mdadm --grow --raid-devices=4 /dev/md2
# mdadm --grow --raid-devices=4 /dev/md3
# mdadm --grow --raid-devices=4 /dev/md4
At this point all of your drives will get very busy as they shift data around evenly across all four drives. Since RAID 1 arrays just have to mirror and don’t have to recalculate any parity, they should complete much faster, but it might take hours to grow the RAID 5 arrays. In the meantime you can watch /proc/mdstat to gauge the progress.
# while [ 1 ]; do cat /proc/mdstat; sleep 15; done;
Hit Ctrl-C to exit out of this script. After the RAID has finally resynced, you are ready to resize your file system. Different file systems have different tools they use to resize (if they support growing the file system), but with the standard case of an ext3 file system you run a file system check first (e2fsck) and then resize2fs:
# e2fsck -f /dev/md3
# resize2fs /dev/md3
Notice that I resized only the RAID 5 array and not /dev/md2. Since RAID 1 only mirrors, no matter how many drives you add to it, it will stay the same size. For the swap partition I just need to reformat it:
# mkswap /dev/md4
Now note that this will change the UUID for the swap partition, so if you reference the UUID in your /etc/fstab file, you will need to mount /dev/md3 to a temporary mount point and update your /etc/fstab. Once the file systems are resized, type Alt-F1 to go back to the rescue menu and select your root file system (in my case it is /dev/md3). Then select “Execute a shell in /dev/md3” (instead of /dev/md3 your rescue operations menu will reference the root partition you selected).
Once I’m in a shell within /dev/md3, I type mount /boot so the /boot partition is available. Then edit /etc/mdadm/mdadm.conf and update each ARRAY reference so that the num-devices value is equal to 4 instead of 3 (or if you updated your array from four disks to five, change this to 5). Save your changes, and then run update-initramfs so the initramfs file has the new mdadm.conf:
# update-initramfs -u 2.6.24-23-server
update-initramfs: Generating /boot/initrd.img-2.6.24-23-server
Replace 2.6.24-23-server with your kernel version if it’s different. Now you can type exit to return to the rescue operations menu and select “Reboot the system” to reboot into your new expanded RAID array.
Ethernet Bonding
As you develop fault-tolerant systems, you quickly realize that after disk failures, network issues are probably the second area that requires redundancy. After all, switches need maintenance from time to time and they do fail, as do networking cards and even Ethernet cables. If you want to be able to survive switch failure or maintenance, you need a system with multiple Ethernet ports connected to redundant switches. Most servers these days come with at least two Ethernet ports if not more, so it makes sense to set up Ethernet bonding, especially when you see how easy it is.
Ethernet bonding is a feature built into the Linux kernel as a module. With Ethernet bonding you can have multiple Ethernet ports that answer to the same IP address. Depending on the bonding mode you choose, you could have an active/passive scenario where one port activates only if the other appears off-line, or you could have an active/active scenario where you accept traffic across all ports.
Full documentation of all of the Ethernet bonding modes is available in the Documentation/networking/bonding.txt file included with any Linux kernel source. Below is an excerpt from that documentation that describes each bond mode:
balance-rr or 0
Round-robin policy: Transmit packets in sequential order from the first available slave through the last. This mode provides load balancing and fault tolerance.
active-backup or 1
Active-backup policy: Only one slave in the bond is active. A different slave becomes active if, and only if, the active slave fails. The bond’s MAC address is externally visible on only one port (network adapter) to avoid confusing the switch.
balance-xor or 2
XOR policy: Transmit based on the selected transmit hash policy. The default policy is a simple [(source MAC address XOR’d with destination MAC address) modulo slave count]. Alternate transmit policies may be selected via the xmit_hash_policy option, described below. This mode provides load balancing and fault tolerance.
broadcast or 3
Broadcast policy: transmits everything on all slave interfaces. This mode provides fault tolerance.
802.3ad or 4
IEEE 802.3ad Dynamic link aggregation. Creates aggregation groups that share the same speed and duplex settings. Utilizes all slaves in the active aggregator according to the 802.3ad specification.
balance-tlb or 5
Adaptive transmit load balancing: channel bonding that does not require any special switch support. The outgoing traffic is distributed according to the current load (computed relative to the speed) on each slave. Incoming traffic is received by the current slave. If the receiving slave fails, another slave takes over the MAC address of the failed receiving slave.
balance-alb or 6
Adaptive load balancing: includes balance-tlb plus receive load balancing (rlb) for IPV4 traffic, and does not require any special switch support. The receive load balancing is achieved by ARP negotiation. The bonding driver intercepts the ARP Replies sent by the local system on their way out and overwrites the source hardware address with the unique hardware address of one of the slaves in the bond such that different peers use different hardware addresses for the server.
So which bonding mode should you use? This can be a difficult question to answer as different networks support certain modes better than others. My recommendation is to try out some of the different bonding modes and test their fail-over by unplugging a cable while pinging the server. Different modes handle port failure differently, especially in the case where a cable is reconnected (or a switch is rebooted) and the port takes 30 seconds or so to come up. On some bonding modes pings will continue with no interruption, while on others you might have a 30-second outage while the port comes up. Note that because the bonding mode is set in the bonding module when it is loaded, if you change the bonding mode you will likely need to reboot (or at least take down the bond0 interface and unload and reload the module). For this example I will choose bonding mode 1 since it has only one port active at a time, so it is relatively safe on any switch.
The first step to configure bonding is to install the ifenslave package:
$ sudo apt-get install ifenslave
This package includes the ifenslave utility which the system will use to bond two interfaces together. The next step is to open /etc/modprobe.d/ aliases, scroll to the bottom of the file, and add
alias bond0 bonding
options bonding mode=1 miimon=100
The options line is what you can use to change your bonding mode. The miimon option tells the kernel how often to check the link state of the interface in milliseconds. In this case it is checked every 100 milliseconds.
The next step is to open your /etc/network/interfaces file and comment out any configuration lines for the network interfaces you will bond (you will probably have a configuration only for eth0). Also, if you have any references to auto eth0, comment those out as well. Then create a new configuration for the bond0 interface that mimics the settings you had for eth0. At the very end of the bond0 configuration you add an extra line called slaves that lists the different interfaces you want to bond together. Here’s an example interfaces file for my server:
# This file describes the network interfaces available on your system
# and how to activate them. For more information, see interfaces(5).

# The loopback network interface
auto lo
iface lo inet loopback

# The primary network interface
#auto eth0
#iface eth0 inet static
#    address 192.168.0.5
#    netmask 255.255.255.0
#    gateway 192.168.0.1

auto bond0
iface bond0 inet static
     address 192.168.0.5
     netmask 255.255.255.0
     gateway 192.168.0.1
     slaves eth0 eth1
Save your changes and then run sudo service networking restart or sudo /etc/init.d/networking restart. Once you run ifconfig, you should see the new bond0 device:
$ sudo ifconfig
bond0     Link encap:Ethernet  HWaddr 00:0c:29:28:13:3b
          inet addr:192.168.0.5  Bcast:192.168.0.255
		    Mask:255.255.255.0
          inet6 addr: fe80::20c:29ff:fe28:133b/64 Scope:Link
          UP BROADCAST RUNNING MASTER MULTICAST  MTU:1500  Metric:1
          RX packets:38 errors:0 dropped:0 overruns:0 frame:0
          TX packets:43 errors:0 dropped:0 overruns:0 carrier:0
          collisions:0 txqueuelen:0
          RX bytes:16644 (16.2 KB)  TX bytes:3282 (3.2 KB)

eth0      Link encap:Ethernet  HWaddr 00:0c:29:28:13:3b
          UP BROADCAST RUNNING SLAVE MULTICAST  MTU:1500  Metric:1
          RX packets:37 errors:0 dropped:0 overruns:0 frame:0
          TX packets:43 errors:0 dropped:0 overruns:0 carrier:0
          collisions:0 txqueuelen:1000
          RX bytes:16584 (16.1 KB)  TX bytes:3282 (3.2 KB)
          Interrupt:17 Base address:0x1400

eth1      Link encap:Ethernet  HWaddr 00:0c:29:28:13:3b
          UP BROADCAST RUNNING SLAVE MULTICAST  MTU:1500  Metric:1
          RX packets:1 errors:0 dropped:0 overruns:0 frame:0
          TX packets:0 errors:0 dropped:0 overruns:0 carrier:0
          collisions:0 txqueuelen:1000
          RX bytes:60 (60.0 B)  TX bytes:0 (0.0 B)
          Interrupt:18 Base address:0x1480

lo        Link encap:Local Loopback
          inet addr:127.0.0.1  Mask:255.0.0.0
          inet6 addr: ::1/128 Scope:Host
          UP LOOPBACK RUNNING  MTU:16436  Metric:1
          RX packets:0 errors:0 dropped:0 overruns:0 frame:0
          TX packets:0 errors:0 dropped:0 overruns:0 carrier:0
          collisions:0 txqueuelen:0
          RX bytes:0 (0.0 B)  TX bytes:0 (0.0 B)
Now you can test fail-over by unplugging eth0 while pinging the IP. Whenever a particular interface is down, the kernel will log both to dmesg and to /var/log/syslog. Here’s an example log entry like one you would see if you unplugged eth0:
Feb 14 16:43:28 kickseed kernel: [ 2901.700054] eth0: link down
Feb 14 16:43:29 kickseed kernel: [ 2901.731190] bonding: bond0:
    link status definitely down for interface eth0, disabling it
Feb 14 16:43:29 kickseed kernel: [ 2901.731300] bonding: bond0:
    making interface eth1 the new active one.
Clusters
Even with RAID and Ethernet bonding on a host there are plenty of  other components that can fail, from the CPU to the software on the  host. If you need a service to stay up even when a host fails, then you  need a cluster. There are a number of different ways to set up Linux  clusters, and there are many different kinds of clusters as well. In  this section I will discuss one of the most common tools used in basic  Linux clusters, Heartbeat, and how to use it to create a basic  fault-tolerant service across two servers. Afterward I will discuss how  to use a tool called DRBD to replicate data between two servers over the  network. These two tools provide a solid foundation you can use for any  number of fault-tolerant services.
As you work with clusters, you will find that most clustering  technologies use some of the same concepts for cluster management. Below  are some of the basic rules and terminologies people use when they  develop a cluster:
- Floating IPs
- Active/active versus active/passive
- Split-brain syndrome
In a standard active/passive Heartbeat cluster, each node (server) has its main IP and there is an additional floating IP that is shared between the nodes. Only the node that is considered active will use and answer to the floating IP address. Services are hosted off of the floating IP address so that when a particular host goes down and the fail-over node assumes the floating IP, it can take over the service.
In an active/active cluster all nodes are running and accepting load at all times. In an active/passive cluster one node is considered the master and accepts all of the load while any other nodes take load only when the master goes down. My examples will be based on an active/passive cluster.
Split-brain syndrome occurs in an active/passive cluster when both nodes believe they are the master and try to assume the load. This can be disastrous for a cluster, especially in the case of shared storage and floating IPs, as both nodes will try to write to storage (that may not accept writes from multiple sources) as well as try to grab the floating IP for themselves. As you will see, one of the big ch